Showing posts with label portfolio. Show all posts

Friday, April 16, 2010

Red Velvet Handbag Cake

Here's the making of the latest custom cake project: It's red velvet cake with cream cheese buttercream filling, and covered in fondant with metallic edible paint and royal icing accents.


Best Wishes for a happy wedding, Kelly!

Monday, March 29, 2010

Hello Kitty Cake: A Strawberry, Custard, & Whipped Cream Extravaganza!


My boyfriend gets to approve every cake that leaves the cakegrrl kitchen. This is a picture of his sample of the Hello Kitty cake I did this past weekend. A two-day construction that lasted Thursday and Friday. One day gets set aside for baking and making the buttercream and fondant and creating the different colors I need. The next day is set aside for making things with a shorter shelf life, such as any fillings that might go in the cake and then actually constructing and decorating the cake.


Here is the base of the cake. The final project was a double 12 X 18 X 3 on the bottom layer and the Kitty head was carved from a double layer of a 9 X 13 X 3 pan. The bottom layer was double chocolate, and filled with a layer of vanilla bean custard, whipped cream and a thin layer of strawberry jam.

Here is the custard recipe I used. (It makes quite a lot--this was enough to fill the cake, big enough to serve 50 people, so you might want to half or even quarter your recipe):
1 c. sugar
12 tbsp. cornstarch
8 c. milk
12 egg yolks, slightly beaten
Contents of 2 vanilla beans

In 1 quart sauce pan, mix sugar and cornstarch. Gradually stir in milk until smooth. Add slightly beaten egg yolks, stirring constantly; bring to boil over medium - low heat and boil 1 minute. Remove. Stir in vanilla bean. Cover surface with plastic wrap and refrigerate until cool. Warning: Do not heat too quickly, you WILL have scrambled eggs. Strain the final custard to remove skin and any clumps from the cornstarch. This custard is good on cake or by itself. Do yourself a favor and use a high quality vanilla (or vanilla bean), and do not add it until you have removed the mixture from the heat.


Then I added a layer of fresh strawberries.


The Kitty head was filled the same way. I always put an icing "wall" all around the border so that the filling does not bulge out the sides.


Then I gave the Kitty head a crumb coat of buttercream frosting, to adhere the fondant layer. Then it was time to decorate and make the character come to life!


This cake was definitely a labor of love, one reason being is I love the Hello Kitty character. It was one of my most expensive cakes to make because of all the eggs and milk and butter, etc I used. I spent a lot of time trying to get everything just right, down to the 3 lemon gumdrops I used to make her little nose. I make an edible metallic paint with a product called lustre dust that makes the surface of the fondant shimmer when it dries.

I hope Alexis liked her birthday cake!

Sunday, March 14, 2010

Mukmuk As Depicted in Spice & Cheesecake

Social media has definitely helped connect me with new customers. The last 4 cakes I have made were all because of people contacting me through twitter or facebook. Additionally, the latest projects I have done have all been unique, fun, and challenging, so I wanted to say thank you.

You might recognize my latest baked creation (or not) as the mascot "sidekick" for the 2010 Vancouver Winter Games. He is called Mukmuk, and is a small and friendly marmot who always supports and cheers loudly for his friends during games and races.

Mukmuk gets his name from the word ‘muckamuck,’ Chinook jargon for ‘food,’ because he loves to eat! I am told marmots are particularly fond of berries and mountain flowers.

I was asked to make the cake with less sweet, non chocolate ingredients. The customer and I came up with a spice cake base with cranberry filling, then a goat cheesecake in the middle. The goat cheesecake was based on a dessert the customer recently tried at a restaurant. The cheesecake layer is topped with more cranberry filling, and another layer of spice cake. The spice cake is also brushed with a honey syrup in between the layers to keep it from drying out.

This is the first cake layer I brushed with the honey syrup and then topped with cranberry filling. I baked entire the cake with three 9 X 13 pans. 2 of the pans I filled with spice cake batter (containing cinnamon, nutmeg, cardamom, clove) and one pan for the cheesecake (made with goat cheese, eggs, lemon, and a scant amount of the spice cake batter).


This is the layer of goat cheesecake.


Then I topped with more cranberry, the other layer of spice cake, then wrapped it to let it sit overnight and let the flavors come together before decorating.


Here's a good shot of the actual cutout of Mukmuk's body, and crumb coat of frosting I put on the cake to adhere the fondant. The frosting is made by blending butter, goat cheese, powdered sugar, and a few other secret ingredients.

Finally I make my own fondant hybrid to improve the crappy boxed kind's flavor. I like the workability of a boxed fondant, but it tastes awful. Most people peel off the fondant anyway, but I am striving to make something which people will want to eat every bite. I make a ratio fondant blend of 1 to 2 parts boxed fondant to 2 to 3 parts of my own buttercream fondant. Then I mix in all the colors, which is a workout all by itself.


And here's the finished product… Happy Birthday, Karla!!


You can learn more about marmots by going to the Vancouver Island Marmots site here.

Sunday, December 13, 2009

Croquembouche with Rum Vanilla Buttercream Filled Profiteroles


A croquembouche is a tower of cream puffs held together with caramel. In France it is the traditional cake for weddings, baptisms or communions. Croquembouche comes from the French "croquant" meaning crackling and "bouche" for mouth. Thus croquembouche refers to the crackling in your mouth when eating this traditional dessert. There was really none of that crackling going on with mine, because of the inclement weather sort of melting the caramel I had so lovingly made and layered on the cake. :(

The croquembouche obsession started when I was watching a show on Bravo last week (Chef's Academy) on which the chef taught his students how to make one. I wanted to make something really special for the food blogger's potluck yesterday. I also wanted it so serve entry for the John Mayer Interfaith Baking Contest II. So, I decided to make this croquembouchethingamabob.

It starts out with making tons of little profiteroles (as pictured above). The dough is super easy to make. Here is the recipe I used (since I won't be sharing the filling recipe). (I doubled it and made about 50-60 puffs).

2 cups water
16 tablespoons (2 sticks) unsalted butter
1 teaspoon salt
3 teaspoons granulated sugar
2 cups flour
8 to 10 eggs

Preheat the oven to 425 degrees. In a large saucepan, bring the water, butter, salt, and sugar to a rolling boil over medium-high heat. When it boils, immediately take the pan off the heat. Stirring with a wooden spoon, add all the flour at once and stir hard until all the flour is incorporated.

Scrape the mixture into a mixer fitted with a paddle attachment (or use a hand mixer). Mix at medium speed. With the mixer running, and working 1 egg at a time, add 6 of the eggs, stopping after each addition to scrape down the sides of the bowl. Mix until the dough is smooth and glossy and the eggs are completely incorporated.

Using a pastry bag fitted with a large plain tip, pipe the dough onto a parchment lined baking sheet. Bake 15 minutes, then reduce the heat to 375-degrees and bake until puffed up and light golden brown, about 20 minutes more.

While everything was cooling, I began working on adornments for the cake... numerous fondant pearls and this candy heart (below), which is how my cake ties into John Mayer. It is the logo seen on the Battle Studies album and used to activate the augmented reality video for "Heartbreak Warfare".


Fondant pearls rolled in lustredust...


I filled each profiterole with a buttercream (secret recipe, but will tell you I threw in the contents of 1 1/2 vanilla beans and a few tablespoons of Bacardi light rum to pimp out my normal buttercream recipe). The puffs of a croquembouche are traditionally filled with pastry cream or sweetened whipping cream, but I thought rum vanilla buttercream would make the cake last a little longer and taste better. I am not a whipped cream fan, except for maybe on ice cream or frozen yogurt.


Here it is with everything but the spun sugar in place. I waited until Sunday (day of potluck to do that).

Below are some side views:


Fondant candy canes and flowers. I had a lot of fun shaping all the decorations.


And finally with the caramel. The recipe is 1/3 cup water, 1 1/4 cups sugar. It takes a long time so be patient. If you boil the caramel too fast, it will crust over and ruin. If you cook the caramel too long and don't cool it in an ice bath, it will turn a dark amber and taste very bad. Otherwise, if you do succeed in the caramel making, the spinning around the cake is a lot of fun!!

Merry Christmas & Happy Interfaith Baking...

Tuesday, December 08, 2009

Eggnog Cake, Buttercream, & Ice Cream

Tomorrow I am bringing in some eggnog treats to my class for a report on food science. I guess you could say I am reporting on both eggs and ice cream making.


In addition to the basic ways eggs can be prepared, they also perform in other ways for the knowledgeable cook. Their cooking properties are so varied that eggs have been called the "cement that holds together the castle of cuisine."

Eggs are used as EMULSIFIERS. They stabilize mixtures so they don’t separate. One common way that eggs are used as an emulsifier is in making mayonnaise. Eggs keep the fat (oil) and the liquid (vinegar or lemon juice) of the mayonnaise evenly blended together.

Eggs are used to COAGULATE. Coagulation occurs when a substance changes from a liquid to a semi-solid or solid. In a quiche or custard, the ability of eggs to coagulate when heated turns an egg-and-milk mixture from a liquid into a semi-solid. Eggs also turn from a liquid to a semi-solid when you scramble them and, because heat is used for a longer time, change all the way from a liquid to a solid when you hard cook them.

Eggs are used to LEAVEN. Many recipes count on the ability of eggs to leaven. When eggs are beaten, a foam of tiny air bubbles is formed. The foam lightens the mixture and increases its volume. When beaten, egg whites will form more foam than egg yolks, so the whites are often beaten separately. Up to a point, the longer the whites are beaten, the more they will foam. If egg-white foam is put into a recipe that’s heated, the air bubbles will expand and the egg white’s protein will coagulate around the air bubbles. The coagulated egg-white protein will trap the air bubbles in the cooked or baked dish and make it light and airy. This process is called leavening.

I used a pasteurized egg product (Eggbeaters) in the ice cream recipe. I bought an ice cream maker two and a half years ago and hardly ever use it. I thought since it is the holidays I ould break it out along with some 'nog.

Also, my chef instructor doesn't like eggnog in a liquid form (as we have discussed this in class) but I thought maybe she would enjoy it in a solid form (in the ice cream) or baked into a cake. Or even in the buttercream I made for the cupcakes.

Finally, there is ANOTHER reason I made the ice cream. I discovered my boyfriend's fondness for it. So, I made extra for him.
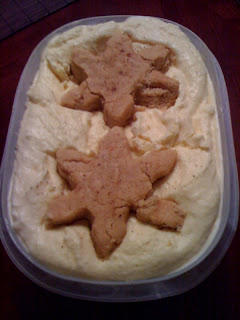


Eggnog Ice Cream
1/2 cup pasteurized egg product
3/4 cup sugar or Splenda
1 cup egg nog (the light kind does fine)
1 cup heavy cream
1 cup whole milk
1 tsp rum
1 tsp Davinci Eggnog Syrup (I decided I would use this because I already had it in the cupboard. If you don't have it, you can use brandy or brandy extract. Be careful of too much alcohol, or your mixture will not freeze.)
1 tsp vanilla
1/8 tsp nutmeg

Combine the egg product and sugar in a mixer and beat until thickened and pale yellow in appearance (a few minutes). Use low speed and stir in the rest of the ingredients.

Turn on your ice cream maker and mix until thickened (25-30 mins). After thickening, transfer ice cream to a freezable (airtight) container. I already had made the eggnog cake to layer in between the ice cream. If you do this, you will want to also make the cake in advance and make sure it is completely cooled before you layer it with the ice cream. Place the ice cream in the freezer until firm.


I won't give away my buttercream recipe here, but I will tell you that I made the frosting eggnog flavored by using eggnog in place of the cream I normally use, and a little of the eggnog syrup to flavor it.

Here is the eggnog cake recipe I used. I will tell you what it is because I ripped it off from someplace else and then changed it to suit my needs. I wanted to achieve a slight contrast to the eggnog ice cream with the ginger and molasses.

Eggnog & Ginger Cake
1 1/2 cups unsalted butter, at room temperature (3 sticks, 12 ounces)
2 cups sugar
1/2 teaspoon grated nutmeg
1 tsp ginger
1/4 tsp cardamom
1 teaspoon salt
4 large eggs
1 Tbs molasses
1/4 cup dark rum (optional) or brandy (optional)
3 1/2 cups cups unbleached flour
2 teaspoons baking powder
1 1/4 cups eggnog or light cream

Preheat oven to 325ish.
Butter and sugar together in mixer, cream it, add your eggs one by one, then you are going to combine all the dry ingredients (sift together). Combine the nog, the rum, and the molasses and add the mixture to the sugar/butter/egg combo alternately with the dry mix. Mix thoroughly but do not overbeat. Pour into a prepared pan or cupcake liners and bake until the cake rises and springs back when touched. 20 minutes maybe?

Let the cake cool completely before you try to layer ice cream or frosting on it.
Ta-da!!

Wednesday, November 11, 2009

Schoolhouse Cooks! Series


As many of you know, I am now enrolled at Le Cordon Bleu (formerly Kitchen Academy) Sacramento.

Still hopelessly on the job search, I decided to enroll in culinary school a few weeks ago. I was walking by the school on my way home from a meeting with someone at Panera Bread. I have been really trying to find work in the field in which I have worked for nearly 15 years: publishing, graphics, printing, or would also love to work in marketing or sales (have 3-5 years experience in each of these areas). There's just nothing out there right now that is biting back. I am a little scared because I am near the end of my bank account...

So, because I really didn't know what else to do, and cooking is about the only thing I can do right... I finally became a culinary student. I know how to make things taste good--I would say I am very talented in menu planning, wine pairing, recipe building, flavor profiling--I just feel I lack technical skills and real kitchen experience to go with it. If I ever want to go into business for myself, I want to have a stronger background and be more confident in the kitchen.


Ideally, even though I began classes this week, I will land a day job soon in marketing, sales, advertising, publishing, et cetera. I have been jobless since June, and my self worth has taken a real beating no matter how many times I tell myself not to take the job rejection personally. If a career miracle rolls my way, I plan on switching to night courses.

I like school so far. Most of my classmates are new to the culinary world altogether and are full of enthusiasm. I have two really nice tablemates at my station. My chef instructor has a lot of experience and great stories to tell.

I am trying to be more outgoing this time in school. I remember how shy I used to be in high school and in college before, and it really didn't serve me well.

So, I will be blogging about my experience in school...not everyday, but definitely every week.

We are working on the ServSafe courses this week--which I already passed in October, so there is less pressure for me there. I don't like the way my uniform is fitting...I need about 3 inches chopped off the length of the pants and the jacket looks ridiculously long on my freakishly short torso. Sigh. Oh well, I will work it out. On the plus side: I am happy with my toque/wig arrangement.

Tuesday, we learned to julianne, and today it was batons, and a dice cut. I need practice. :(

I am very envious of the pastry students that come in when our class leaves. But, I know I need to take the full curriculum to be more employable.

I usually don't get this stream of consciousness or personal in my writing anymore, but I am thinking that might be the turn this series takes, since it is indeed my personal journey through culinary school. Bear with me on that! :) OK, it's late. Cakegrrl out!

Sunday, September 27, 2009

Rosemary Shortbreads with Lemon Parmesan Goat Cheese


I made these (savory) Rosemary Shortbread Cookies with a lemon goat cheese spread for a recent presentation at Drexel University. It's a basic butter shortbread and I used a mortar and pestle to release a little more of the oil from the rosemary.

Shortbread Ingredients:
2 cups flour
3/4 tsp salt
1/2 tsp. baking powder
1 Tbs rosemary (crush in mortar and pestle to release oil)
1 1/2 sticks of butter
2 Tbs honey
1/2 cup powdered sugar

Combine the flour, salt, baking powder, and rosemary and set aside, then in another bowl combine the butter and sugar, honey. Add the dry mixture to the butter mixture and knead with your hands. Set in refrigerator for about a half hour... Then preheat oven to 350° ish... Roll out dough and cut out with your favorite cookie cutters. Bake until golden brown.

Cheese Filling:
1 pkg goat cheese
1/2 pkg cream cheese
lemon zest
1/2 tsp lemon juice
1/2 cup shredded parmesan cheese (the good kind, not the powdered kind) ;)
Combine all ingredients in a bowl and fill a pastry bag with the mixture.
When rosemary shortbreads come out of the oven, allow them to cool and then make the shortbreads into mini sandwiches using the cheese filling.

Friday, September 04, 2009

Happy 3rd Birthday, Riley.

I love birthday cakes that masquerade as wedding cakes... Tiers and fondant and buttercream swirls... I wanted to do something really special for a client of mine, Kelli. (She is one of the many people I have met through using Twitter & Social Media.) The occasion was her daughter's 3rd birthday, and she wanted something with a strawberry theme. So below is what came together:


Vanilla Bean Cake Layered with Strawberry Jam, Strawberry Buttercream & Iced in Fondant. Fondant strawberries.


Thanks for the opportunity. :) xo
An off topic PS: I was really impressed by Kelli's CA State Fair photos this year. For updates on her work, visit her blog here. Or follow her on twitter.